Manage your Change Management activities using the Blueprints and Plans page to support your impacted groups through their ADKAR journey.
Default Views
Within the Blueprints and Plans page, we have created three 'default' views:
- All Activities - Displays all activties.
- ADKAR Blueprint - Displays activities grouped by ADKAR Outcome, with configured columns. (This is the current default view for users when they click into the Blueprints and Plans page)
- Core Plans - Displays activities grouped by Plan Type.
Create Your Own View
Configure your activities using the Group, Filter, Sort and Columns options at the top of the page to organize your activities in ways that are most useful to you.
You can then save configurations as new views by:
- Clicking the [Save View] button that appears
- Choose [Save as New View] or [Update Current View]
- You can export any views to a PDF by clicking [Export] at the top of the page


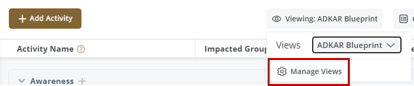
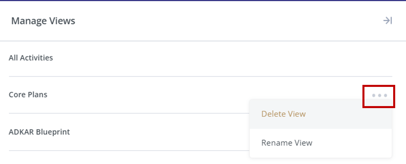
Manage Your Views
You can manage views by:
- Click on the [Viewing: ] button
- Choose [Manage Views] which will open a panel.
- Click on the 3-dot elipses, to delete or rename the views.

Adding and Managing Activities
How do I add an activity?
There are two ways you can add an activity:
- Click on the [+Add Activity] at the top of the page or;
- Click on the [+] icon next to the ADKAR element or Plan type in the table.
- A content panel will open on the right side of the screen. Fill in with the information you need. An [Activity Name] is required to add it to the table.
- As you fill in the data, Proxima will autosave and add the data to the table.
- You can edit information directly in the table once an activity is created.
How can I delete an activity?
- Hover on the [Activity] and click on the [Details ] button that appears. This will open the content panel.
- In the top right corner of the panel will be a 3 dot ellipsis icon. Click on the icon and select [Delete].
- Note: Clicking [Delete] will automatically delete the activity and cannot be undone.
Can I make bulk changes to activities?
At this time, no.
Formatting and Configurations

- Configure your activities using the Group, Filter, Sort, and Columns in the action bar.
- Manage Plan Types and ADKAR Milestone dates using the 3-dot elipsis icon in the action bar.
- Export any view to a PDF by clicking on the [Export] button on the action bar.
- Additional configuration is available at the column level of the table. For more information on those options, see the notes below.
Notes:
- Any formatting or configurations will apply for all collaborators on the project
- We no longer have the Gauge Gap field available. See here for more information on that update.
Additional Confirguration Options at Column Level
Sorting:
- Hover over the column headers. If sorting is enabled for that field you will see an "up/down arrow" icon appear.
- Click on the icon and it will sort ascending. Click it a second time and it will sort descending. Click it a third time and the sort will be removed.
Drag and Drop:
- Hover over the left of the [Activity Name]
- A 'grid' icon will appear.
- Click and hold the grid icon and drag the item to a new position in the order
Notes:
- Column sorting does not persist from page to page. So, if you a leave a page and come back, your sort will no longer be applied.
- You cannot drag activities to new sections and re-assign them. You can only drag and sort a within a section.
- Sorts are specifics to each page.
- The sort order you set with drag and drop is not available in exports. Exports are simply sorted by when activities were created.
- If you are actively sorting by a specific column header, the drag and drop feature is disabled.
Filtering:
- Hover over the column header you want to filter by. A 'three line' icon will appear to the right side of that column header.
- Click on the icon and a column settings panel will open up. At the top of the panel, there is a filter icon. Click on that icon.
- Depending on the type of data in the field, you will be able to either type in, select a date, or pick from items in a list to filter by. For multi-select fields, the filter runs an "or" filter. So it will included any row that has either of the selected options available.
Note: Filters do not persist from page to page. So if you a leave a page and come back, your filter will no longer be applied.
Column Width
- Hover over the line in between column headers and your pointer will change to a horizontal arrow.
- Click and hold to drag the column size to your desired width.
You can also Autosize the columns:
- Hover over the column header you want to Autosize. A 'three line' icon will appear to the right side of that column header.
- Click on the icon and a column settings panel will open up.
- Select [Autosize This Colum] or [Autosize All Columns] The columns will expand automatically to fit the text.
Note: Autosize do not persist from page to page. So, if you a leave a page and come back, your Autosize will no longer be applied.